
Root of Nightmares
Gotta go dish out some pain to the Final God of Pain.
(Note: Much of this is a cleaned-up form of a guide I wrote for my Fireteam’s reference during Contest Mode, from our own mechanics deciphering. I have attempted to remove extraneous information and update things, but please let me know if I’ve missed anything.)
Node Mechanic
TODO
Secret Deepsight Chest
TODO
Deepsight Room 1
Encounter 1
Whilst this can be done with a 5-1 split, splitting into a team of 4 and a team of 2 is preferable for speed.
Team 1 has a simple objective: kill psions to spawn tormentors, and kill said tormentors before the time expires to add time. Be aware of Barrier champions. You may benefit from keeping a tormentor alive on low HP to kill on the next section, as time will fully reset as Team 2 completes each section.
Team 2 should be focussed on getting a buff from the glowing white orb with an area field around it. Do not shoot this again if someone already has the buff! Doing so disables all orbs for a lengthy period of time. Once buffed, they should follow the beam of light which stretches from the orb to the next orb. Stand on the pad and shoot the black gooey thing to create another orb, and then go back to the source orb (this can change at this point) to re-buff. Re-buffing is required to spawn the next gooey thing for the next orb — it cannot be skipped! There are 4 sections of orbs; after each section, you will have a small reprieve (the timer will stop) to clear some adds in preparation for when the timer resets. You should call out before shooting the final orb to notify Team 1, thus allowing them to keep a tormentor alive if they were about to kill it.
Encounter 2
Split into two teams of 3, where each team will be comprised of two add-clearers and an orb-manager. Each team will go to a different side.
Similar to encounter 1 (complete with Barrier champions), except there’s now two sides and two different colours of orbs. There is a timer again, but this cannot be extended and will result in an organic wall forming to kick you out.
Add-clearers just kill adds and the Barrier champion which spawns after the side’s source has moved. However, many adds are immune unless you have the buff (“Flux of Light”/“Flux of Darkness”), so they should join their orb-manager when they go to refresh their buff — this should be called out in advance or simply anticipated.
Each orb-manager will either work on Light or Dark orbs (based on the colour of the source on their side), in which case they do the same thing as in encounter 1 — but each orb will alternate sides! Thus, you will need to be quick at getting across the gap, using the launch pads (it’s probably worth capping your framerate to 60~90 here, as physics is screwy).
Once both light and dark have completed their sequence, the timer will stop and a boss will spawn. Kill everything to enable the third launch pad, which will allow you to jump to the next floor, and repeat the process two more times.
Encounter 3: Macrocosm ()
Team composition is 2 add-clearers and 4 runners.
There is a lot of Solar damage — focus on handling this!
The map features a central area, which the add-clearers will keep clear, and 4 platforms. Each runner is assigned to a platform. Once the Cabal Centurion is killed for each side, another Centurion will spawn on that side’s platforms. Runners should kill it (being mindful of psions which spawn from behind!) to obtain a buff, Planetary Insight. Killing the first one also starts a Planetary Shift countdown, indicated in the buff area. Runners can look at the three planets above their platform to see the affinity of each planet (dark or light). The lower platforms should swap a planet — and likewise for the upper platforms — such that the light planets are on the left, and the dark planets are on the right. Note: each runner must interact with the planet they wish to move, and then go to the planet they wish to replace and interact with it. Planets move at the end of Planetary Shift, and there must be a space available for each moving planet, else they will go back to their prior positions.
You can use a scheme — such as the following diagram courtesy of TheSpitfire from my Fireteam, flexing his Microsoft Paint skills — to coordinate communicating which planets should be swapped between each side:
Once all planets have been sorted, shooting the Crux in the middle will “reveal the indexed planets”. This spawns a new set of Centurions, and the three planets in the middle will now have affinities. The platforms in the centre will also have interactable orbs (like the other planets). For each planet in the middle, the corresponding plate should have an appropriate planet moved to it. For example, if the middle planets are Light, Dark, Light, then two planets from the light side should be moved to the left and right plates, and a planet from the dark side should be moved to the middle plate. Any planet from the correct side will suffice.
Once this is complete, the planets will move at the end of Planetary Shift, and the Crux should be shot again, thus triggering DPS. The boss will have a glow corresponding to either light or dark, and players should stand on a plate of the corresponding colour to do damage. Eventually, the boss will change affinity, and the players must move to another plate (of the corresponding type). You may leave the plate and keep the buff to deal damage for ~10 seconds.
DO NOT ACCIDENTALLY STEP ON A PLATE WHILST MOVING TO ANOTHER. This activates the plate and significantly harms your DPS time.
At the end of DPS (which has a fixed time, so if you take too long on the first two plates to do requisite damage you may have a very short third plate!), players should reset positions and repeat this process again.
Final Stand enables all plates, and is simply a case of bursting the rest of the boss’ health down. It’s unclear to me if there’s a wipe condition here, as we’ve never failed a Final Stand on this encounter.
N.B: The pre-DPS phase is timed. If too much time is taken, the boss will perform a Syzygy, wiping the fireteam. There is no way to stop this.
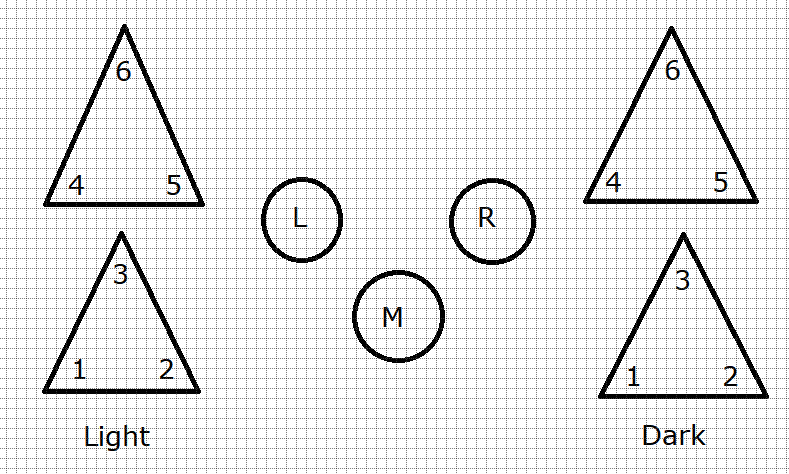
Encounter 4
This ‘encounter’ is, by-and-large, a jumping puzzle. However, the entire time, Nezarec will be emitting Darkness waves, which you must protect yourself against by acquiring the Darkness Refuge buff (which will only last for a short time), lest you be instakilled.
This buff is obtained by first shooting a Light node whilst in its area (thereby giving you a Light buff) and then shooting a Darkness node within its area. This process converts the Darkness node into a visually-distinct Refuge point for a modest amount of time (approximately the amount of time between each instakill wave). You can refresh your own Refuge buff whilst the Refuge point is active by simply standing back in it, and other players may use it too without going through the conversion steps.
Simply continue moving forwards through the jumping puzzle, avoiding being killed by the instakill waves, and you will make it to the end rather easily.
Secret Chest
Deepsight Room 3
Encounter 5 (Nezarec, Final God of Pain)
TODO